Preparing and using the Old Masters Formula Ground
This ground is no longer offered, but the instructions are here for those who wish to use a glue-based ground.
Sprinkle the one half ounce package of glue powder into two and 7/8 cups (liquid measure) of water, stirring constantly with a wire whisk. Rinse whisk thoroughly immediately after this, and every, use! Cover vessel and allow to stand at room temperature for at least one hour.
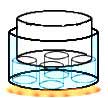 Heat inside second vessel, one inside another to provide a water bath – nested stock pots work well, or you can stand one vessel on submerged small jars, glasses, cans, beads or marbles to raise it up (see illustration ); stir frequently and monitor the temperature.
 When 120°F. is reached, turn down the heat and gently pour one pound of pigment powder into the hot glue, whisking constantly, while monitoring the temperature. Add pigment until the mixture is consistency of light cream. Use a large stainless steel spoon to bring pigment up from the bottom of the vessel, and stir well to see if desired consistency is reached.You can sift the pigment through a wire strainer or sieve first, for a smoother texture.
Note: thinner is better than too thick, you can always add more pigment tomorrow.
Pour the liquid ground into a new, clean vessel. Screen if desired; I don’t. You can use this right away if you desire, or you can cover and refrigerate over night. Note: sheer polyester fabric provides the finest screen, but the ground must be worked through this with a utensil of some sort, and it takes a while. A faster alternative is doubled-up plastic window screening, but some granularity may result.
The absolutely finest surface is obtained by mulling, which achieves a greater dispersion of the pigment particles, but you’ll want to ensure that the tools are the same temperature as the ground, or mull the pigment into part of the water before it’s blended into the glue. Nobody I know is currently doing this ! I generally just sand between coats of the screened ground, and that works fine for me.
Using the ground:
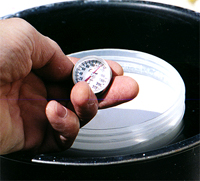
Cover your work area with a drop cloth or newspapers. If you do get the ground on anything other than the target surface, wipe it immediately with a hot wet sponge. Dried and cured ground is very resistant to abrasion and weakening by water, so if you don’t get to it right away, you may have to live with it. Heat the ground to 120-135 °F in the water bath arrangement again – 135 °F is about the same temperature as what you can stand to put your hand in at your kitchen sink. Check the interior of the ground with a thermometer to ascertain that this temperature has been reached, or test it by hand, using extreme caution; Under no circumstances allow the ground to be heated over 140°F, and don’t burn yourself either! The adhesive qualities of the ground can be destroyed by excess heat, plus it may become discolored. Basically, you just want it to become liquified, enough to be easily brushable. Don’t cook it on the stove!
Apply the first coat of ground to the paper in even strokes in one direction with a fine, wide brush such as a one-inch or larger red sable or equivalent synthetic. Wet the brush in clean water first to prevent the ground from drying and hardening inside the ferrule. Try to leave as smooth an application as possible – remember, this is going to be your drawing surface. Work quickly — the ground sets fast. Wash that expensive brush right now! and allow the first coat to dry. Note: the finer the brush, the smoother the surface and the better the response. Yes, I know, wide sables aren’t cheap. That’s why you never leave it there unwashed for any period of time, right? And, believe me, after drawing on surfaces with hills and valleys left by a coarse throwaway “chip” brush, not to mention stray boar bristles bonded forever to what was going to be your masterpiece, you’ll be searching for wide, smooth brushes. I use one called a “Polar Flo,” about 2 inches wide.
Apply second, third and fourth coats as above but across the previous direction(s). Allow to thoroughly dry.
If the resulting surface is streaked or bumpy, sand lightly and gently with fine (#400 or finer) open-coat sandpaper (included in the Complete Kit) until smooth; otherwise, wipe the surface with a damp lint-free cloth.
Remove the paper from the stretching surface when it is completely dry! When I say dry I mean DRY! Treat the results as you would any high quality and very responsive drawing surface, and make sure your hands are clean and free of oils, or wear archivist’s cotton gloves. When drawing, use a cover sheet to reduce contact with the surface.