Surfaces and supports: Most people think of a stretched canvas as a surface, but it’s not. Canvases need to be prepared to accept silverpoint, or, indeed, many other materials. Canvas, panel, board, or paper – these are your supports. The ground that you lay down to prepare the support to receive your drawing or painting is your surface.
 Preparing board or panel –
If using plywood for paper stretching, I recommend that you seal it against moisture intrusion first. Hardwood panels such as birch are better.
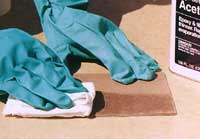
On Masonite, clean off any oils or other contaminants using acetone or denatured alcohol; use gloves to protect yourself from contact, with acetone especially.
If you are using boards or panels as your support, go to the Surface Preparation page. If you are preparing paper, see below:
Wipe all surfaces, new or seasoned, with a damp cloth immediately prior to wetting the paper.
Almost any paper can be used. I recommend a relatively thick, fine-surfaced paper – 80-lb watercolor paper works nicely, as does 4-ply bristol, which is my preferred paper; in any case, you should ensure that the paper has a high or total rag content, as wood-fiber papers don’t stretch well. But if you simply must use wood-based papers, treat it very gently!
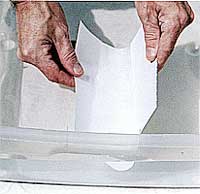 Wet the paper thoroughly by immersing it completely in water for a few minutes, (less if it’s wood pulp based – see technique for thinner, wood-based papers in the photo to the left) and lay it on a Masonite, plywood or hardwood panel (at least four inches larger in each dimension, if using the taping method.) Drain off excess water, and wipe gently with a clean cellulose sponge that is used only for this purpose, smoothing the paper out to make sure there are no bubbles or wrinkles.
Be very gentle with wood-based papers, and don’t use the sponge; it tends to cause raisins.
The following two steps are for the taping method, which I no longer use but include for thoroughness:
 Precut gummed brown kraft-faced tape – the type that you wet to make stick.
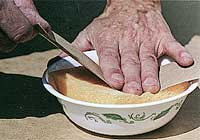
Wet the tape by pulling it across a wet sponge sitting in a saucer of water.
Tape the paper to the board, smoothing and pressing each piece of tape as you go along. Don’t be too aggressive, it can slide and then stick just where you don’t want it.
Set this one aside and allow the paper to dry thoroughly; apply masking tape over the inside edges to keep the ground from seeping under the kraft tape and weakening the bond.
Instead of taping the paper, you can staple or tack paper to boards if you don’t care about the paper’s edges. Alternatively, there are commercial paper stretching devices such as “Zipp Clamps;” I’ve used them successfully and like them, but the cost compared to tape is high. On the other hand, removing stretched and prepared paper which has been successfully taped to a board is sometimes challenging.
 My present prefered method is to make a half-inch plywood clamping board slightly smaller than the paper; using binder clips, as shown at left, I gently stretch and clip the paper. Large pieces require a lot of clips, thicker papers require closer spacing and even more clips. I start at the middle of each side first, then work my way toward the corners, where I fold the overlapping ends into an even vee-split, then clip that too.
When the paper has dried, one can either mask off the clips with wide masking tape, or use masking tape on the back side flap of paper and remove the clips (cleaning ground off of clips is not fun.)
Note: I recommend that you stretch more than one piece at a time. Stretching paper takes a certain amount of practice, and success with one piece is not guaranteed. Most failures can be attributed to insufficient or excessive wetting of the gummed kraft tape.
Note 2: Daniel Smith had a description of several methods for stretching paper. Art Cafe also had one, as did Big City Art – in fact, there are a lot of places on the Web with articles on this process. I no longer link them, keeping up with where they move them is a pain. Do a Google search…
Alternatives:
- Use small pieces of paper, moisten slightly, then tape down using masking tape. You will get some puddling, rippling or “taco shell” effects, but with small pieces it may not matter as much – and with small pieces, it’s easier to flatten them out again by pressing them under a large book.
- Or, prepare Masonite or wooden panels as described above.
Note: The response on a panel is very different than drawing on paper. I enjoy using both surfaces, but I prefer the look of drawings on paper. - As an experiment, try stretching canvas over a panel. See the sequence below for my process.
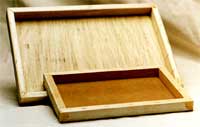 The panels waiting for canvas. One is mahogany plywood with a support framework; the other is masonite.
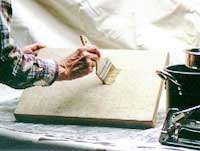 I’ve applied glue water to the face of the panel and the underside of the canvas, then stretched and stapled the canvas to the frame as I would for painting, and here I’m applying another liberal coat to the face. Next I’ll hang it to dry.
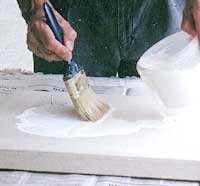 Working the ground into the canvas surface. A super-fine brush is not necessary here, at least not for the first two coats.
More about Grounds in Surface Preparation: ->